Checklist for Insulating Your Attic
Insulating your attic is one of the most effective ways to improve your home’s comfort and energy efficiency. Proper attic insulation minimises heat loss during the winter and maintains a cooler environment in the summer, reducing the strain on your heating system.
Before starting, it’s essential to understand the different types of insulation available and their benefits. Quality attic insulation ensures improved thermal performance and significantly reduces energy bills, making your home more cost-effective.
When planning to insulate your attic, keep an eye on the insulation grants available that can ease the financial burden. For instance, the Sustainable Energy Authority of Ireland offers programmes to achieve optimal insulation standards. Starting with your attic is usually the most cost-effective method of house insulation.
Assessing Your Attic
Proper attic inspection is crucial for effective insulation. This includes determining insulation needs, inspecting existing insulation, and checking for air leaks.
Determining Insulation Needs
First, identify your attic’s specific needs. Measure the area to be insulated, including the distance between joists and rafters. Knowing the square footage helps calculate the amount of insulation material required.
Consider the climate where you live. Colder regions often need higher R-values, indicating insulation’s heat flow resistance. R-values vary by material, so choose accordingly.
Assess the current insulation level. Use a ruler to measure the depth of existing insulation. Well-insulated attics typically have insulation between 270 mm to 400 mm. If it falls short, adding more is essential.
Inspecting Existing Insulation
Examine the current insulation thoroughly. Look for signs of wear or damage. Compressed or damp insulation is ineffective and might need replacement. Inspect for gaps or uneven coverage. Insulation must be spread evenly without any blank spots.
Check the type of existing insulation. Older homes might have materials that don’t meet modern standards. Upgrading to current, more efficient options can significantly improve energy efficiency. Also, consider the presence of moisture. Wet insulation can lead to mould and mildew, compromising air quality and integrity.
Checking for Air Leaks
Identify air leaks which can undermine insulation efforts. These leaks often occur around vents, chimneys, dormers, and framework joints. Use a smoke pencil or an incense stick near suspect areas; the smoke will waver if there’s a draft.
Seal leaks with caulk or weatherstripping to prevent warm and cold air from escaping. Pay close attention to the roof and eaves. Proper sealing around roof edges and attic doors is crucial. Also, examine insulation near electrical fixtures and plumbing vents, as gaps are common there.
Using these methods, you can ensure your attic is ready for proper insulation, creating a more energy-efficient home.
Types of Insulation Materials
Selecting the right insulation material is essential for maintaining energy efficiency and comfort in your home. The three main types of materials are fibreglass, cellulose, and foam boards, each with its unique qualities.
Fibreglass Options
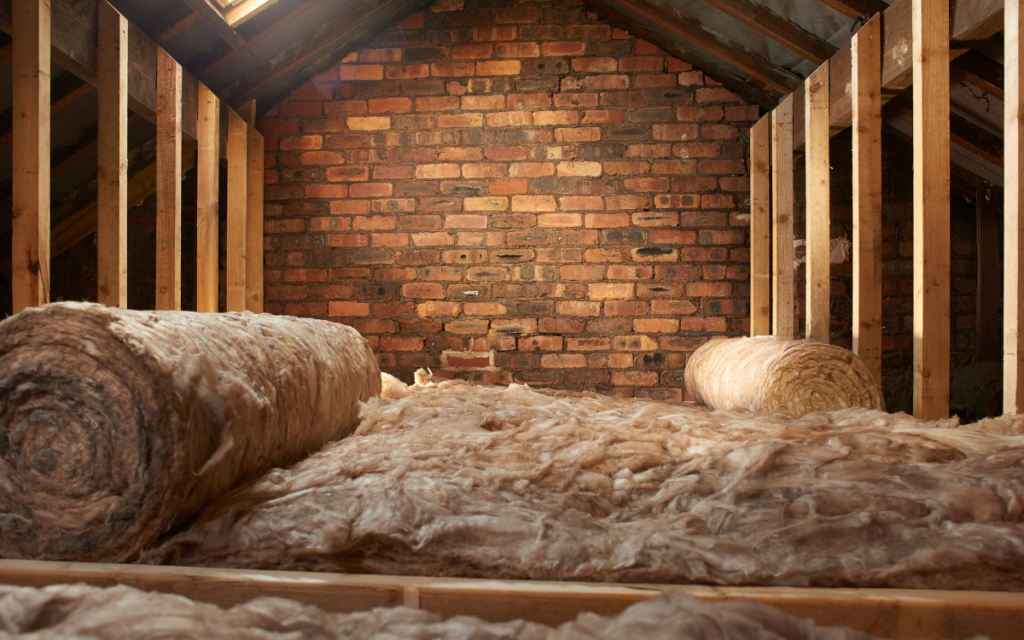
Fibreglass insulation is one of the most popular choices for attic insulation. It is made from extremely fine glass fibres. Fibreglass insulation comes in two main forms: batts and blown-in.
Batts are pre-cut panels that fit between standard joists and rafters. They are easy to install and can be placed over existing insulation for added efficiency. Blown-in fibreglass is a loose-fill type, suitable for filling gaps and covering irregularly shaped areas. It is applied using a special machine that blows the insulation material into place.
Fibreglass is known for its fire-resistant properties and can last a long time if kept dry. However, handling fibreglass can cause skin and respiratory irritation, so protective clothing and equipment are recommended during installation.
Cellulose Solutions
Cellulose insulation is made from recycled paper products, primarily newspapers. It is treated with chemicals to provide fire resistance and is also known for its eco-friendly nature.
There are two main types: Loose-fill and wet-spray. Loose-fill cellulose is ideal for irregularly shaped areas and can be blown into spaces using a machine. This helps ensure that all gaps and voids are filled, providing excellent coverage. Wet-spray cellulose contains a small amount of water, which helps it adhere to surfaces and is typically used in new constructions or major renovations.
A significant advantage of cellulose insulation is its ability to fit into tight spaces and around obstructions. It also has good soundproofing qualities. One downside is that it can settle over time, which might reduce its effectiveness, so periodic checks are recommended.
Foam Board Variants
Foam board insulation consists of rigid panels that can be used for insulating attic spaces, offering high insulating values with minimal thickness. It is available in several types, such as polystyrene, polyisocyanurate, and polyurethane.
Polystyrene foam board comes in two forms: expanded (EPS) and extruded (XPS). Both are water-resistant, but XPS has a higher density and insulating value. Polyisocyanurate and polyurethane boards have higher R-values and are often used in external applications due to their heat resistance.
Foam boards are praised for their high insulation value and durability. They are easy to cut and fit into place, making them ideal for DIY projects. However, they need to be properly sealed at the edges to prevent air leaks. Additionally, some types of foam board insulation may need a fire barrier due to their flammability.
Preparing for Installation
Proper preparation is crucial for effective attic insulation. This involves sealing gaps, protecting against moisture, and ensuring good ventilation to maintain a comfortable and energy-efficient home.
Sealing the Attic
Sealing your attic is essential to prevent heat loss. Begin by identifying gaps and cracks around the perimeter and floors. Use caulk or expanding foam to seal small openings. For larger gaps, consider using weatherstripping or foam board insulation.
Pay close attention to areas around pipes, wires, and ducts. These spots often have significant air leaks. Sealing these areas helps reduce drafts and improves overall energy efficiency. Make sure to check for gaps around attic vents and eaves as well. Properly sealed attics contribute to better temperature control and lower energy bills.
Protecting Against Moisture
Moisture protection is vital to prevent insulation damage and mould growth. Start by inspecting the attic for any signs of leaks or water damage. Fix any roof leaks or damaged shingles.
Install a vapour barrier to keep moisture out of the insulation. This barrier should be placed on the warm side of the insulation, typically right under the roof. Ensure that any existing moisture is thoroughly dried before installation.
Pay attention to areas around the soffit and eaves where moisture build-up can be problematic. Protecting against moisture ensures the longevity and effectiveness of the insulation.
Ensuring Adequate Ventilation
Adequate ventilation is key to preventing moisture build-up and maintaining indoor air quality. Begin by assessing the current ventilation system in your attic. Ensure that soffit vents, ridge vents, and attic vents are clear and unobstructed.
Install additional vents if necessary to improve air circulation. Proper ventilation helps in maintaining a balanced temperature in the attic and reduces the risk of ice dams in winter. It also prolongs the life of both the roof and insulation.
Regularly check and maintain attic vents to ensure they remain effective. Proper ventilation is a critical aspect of attic insulation, contributing to a healthier and more energy-efficient home.
The Installation Process
Properly insulating your attic involves several key steps, including laying out the materials, cutting and fitting them, and securing everything in place. This ensures effective insulation and energy efficiency.
Laying out Insulation Material
Begin by selecting the right insulation type for your attic. Common choices include loose-fill insulation, rigid foam insulation, and batt insulation.
Loose-fill insulation is ideal for irregularly shaped spaces or to fill gaps. Rigid foam insulation provides high insulating value and is useful for areas requiring a slim profile. Batt insulation, commonly made from fibreglass or mineral wool, is suitable for flat or slightly sloped spaces.
Before starting, remove any existing insulation that may be damaged or degrading. Clean the attic thoroughly to ensure a dust-free and debris-free environment. Lay out the insulation materials across the attic floor, starting from the farthest point and moving toward the exit.
Ensure a uniform distribution to avoid gaps and cold spots. For batt insulation, place it between the floor joists without compressing it.
Cutting and Fitting Insulation
Measure the dimensions of the spaces between your attic joists. Cut the insulation materials to fit these measurements precisely.
For batt insulation, use a utility knife to cut the material slightly wider than the space it will fill. This ensures it stays in place without gaps. For rigid foam insulation, a saw can provide clean cuts.
When working with loose-fill insulation, use equipment like a blower to distribute the insulation evenly. This ensures no area is left uncovered. Always wear protective gear such as gloves, masks, and goggles to protect yourself from the insulation fibres.
Fit the insulation snugly into the gaps, pressing gently but avoiding compression which can reduce its effectiveness. For attic floors, layer the insulation over the joists in a criss-cross pattern to enhance coverage.
Securing Insulation in Place
Secure the insulation to keep it in place and ensure long-term effectiveness. Use staples, adhesive sprays, or insulation supports depending on the type of insulation.
For batt insulation, staple the edges to the wooden joists. Be careful not to compress the material as this reduces its insulating properties. Loose-fill insulation often does not require securing if applied correctly and evenly.
Rigid foam insulation may need adhesive spray along edges and seams to keep it firmly attached. Ensure that any gaps or joints are sealed with foam sealant or tape to prevent air leaks.
Proper placement and securing of the insulation reduce heat loss and improve energy efficiency, making your home warmer in winter and cooler in summer.
Safety and Professional Advice
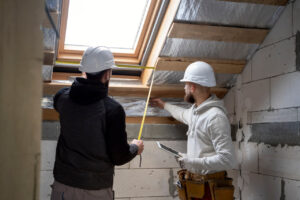
When insulating your attic, prioritising safety and involving professionals can make a significant difference. It’s essential to use proper protective gear and ensure compliance with building regulations.
Hiring a Professional Contractor
Hiring a professional contractor ensures that the insulation is installed correctly and safely. Professionals have the experience needed to handle various insulation materials and are knowledgeable about the best practices for each type.
They can also identify potential issues, such as moisture problems or structural deficiencies, that could affect the insulation’s performance. Moreover, contractors are familiar with the grants and financial incentives available for attic insulation, potentially lowering the overall cost.
Adhering to Building Codes
Adhering to building codes is crucial for safety and legal compliance. These regulations ensure that the installation does not compromise the structural integrity of the home and minimises fire hazards.
Building codes may specify the required thickness and type of insulation material. They might also outline ventilation requirements to prevent moisture buildup. Ensuring that the work complies with these standards helps in maintaining the energy efficiency and safety of the home.
Using Protective Gear
Using protective gear is vital when working in an attic space. Essential items include gloves, a mask, and safety goggles. Gloves protect your hands from cuts and irritation, especially when handling materials like fibreglass. A mask guards against inhaling dust and fibres, which can harm the lungs.
Safety goggles shield your eyes from debris. Wearing these items can prevent injuries and make the insulation process more comfortable. It’s also wise to wear long-sleeved clothing to protect your skin.
Frequently Asked Questions
Preparing your attic properly and choosing the right materials can greatly improve its insulation. Consider factors such as local regulations and potential costs.
How should one prepare an attic for insulation?
First, clear out any stored items and debris. Make sure there are no roof leaks or damage. You should also seal any gaps or cracks to prevent air leaks before you start insulation.
What materials are required for insulating an attic?
Common materials include fibreglass, cellulose, and spray foam. Each has its own benefits. Fibreglass is often used for its cost-effectiveness. Cellulose is eco-friendly, and spray foam offers excellent air sealing properties.
What factors should be considered when choosing attic insulation?
Consider R-value, which measures thermal resistance. Also, think about the climate you live in, the type of insulation material, and its installation requirements. Budget and potential energy savings are also important.
What are the current attic insulation regulations in Ireland?
In Ireland, attic insulation should typically be 300mm in depth. This can include 200mm between the joists and an additional 200mm across the joists. Specific guidelines must be followed to ensure compliance with Irish building standards.
How much does it cost to insulate an attic in Ireland?
The cost can vary depending on the size of your attic and the type of insulation used. On average, homeowners might spend between €800 and €2,000.
How can one apply for an attic insulation grant?
Attic insulation grants are available in Ireland through schemes like the Sustainable Energy Authority of Ireland (SEAI). Applications can be submitted online via the SEAI website, which also provides detailed guidelines and eligibility criteria.